User Guide
Learn Playtime
| Last update of text: | 2018-04-16 (v1.14.1) |
| Last update of relevant screenshots: | 2016-01-24 (v1.11.0) |
Installation
There are two ways of installing Playtime:
- The normal way
- Use this if you want to use Playtime within a normal non-portable REAPER installation.
- It's the easiest way because you can use a convenient installer.
- The portable way
- Use this if you want to use Playtime within a portable REAPER installation.
- There's no convenient installer for that. You must download a ZIP file and unpack it into the right directory.
The normal way
Mac OS X
Just download the installer, start it and follow the steps.
Gatekeeper might refuse to start the installer:
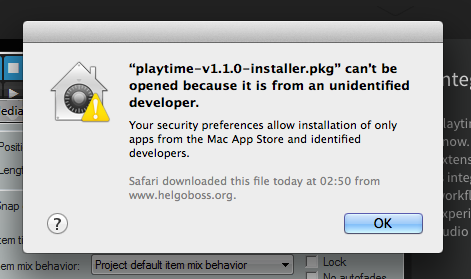
In that case, just locate the downloaded installer in Finder, right- or CTRL-click it and choose "Open" from the context menu:
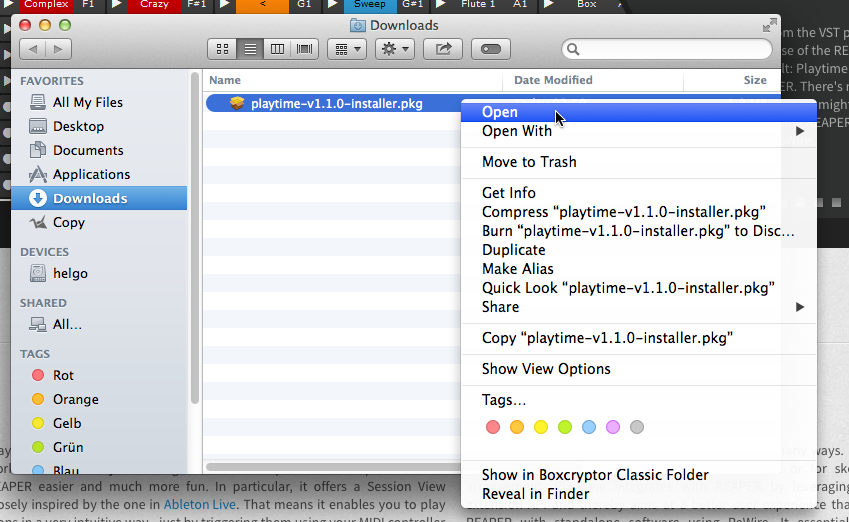
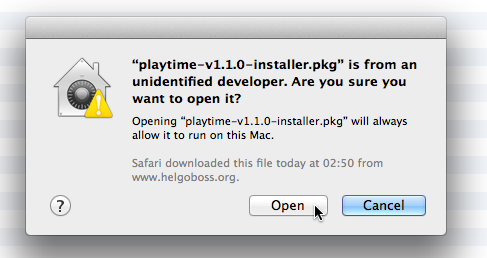
When the warning appears, click the "Open" button to confirm that you wish to use the installer:
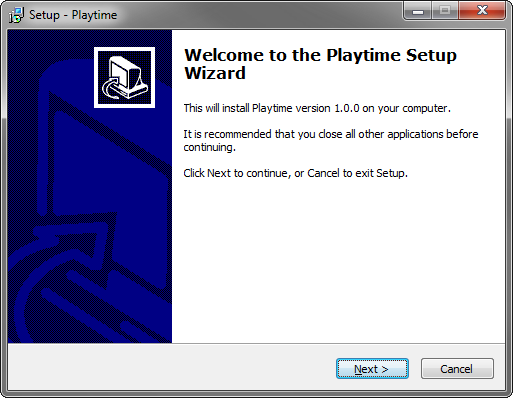
Windows
Just download the installer, start it and follow the steps.
If you are interested in technical details, read on, otherwise you can immediately start enjoying Playtime and proceed to section 2 "Basics".
- Since version 1.14.0, the installer copies the Playtime VST plugins to "C:\Program Files\Playtime\VstPlugins" (64-bit) respectively "C:\Program Files (x86)\Playtime\VstPlugins" (32-bit) and modifies REAPER's VST plugin scanning paths to include this directory. Older versions tried to detect the correct common VST directory but that was not very reliable and could lead to undesired behavior.
- It makes sure that REAPER 32-bit points to 32-bit Playtime and REAPER 64-bit points to 64-bit Playtime.
- Don't try to use Playtime 32-bit in REAPER 64-bit using bridging mode. Unlike other VST plugins, it won't work at all.
- Background: Playtime needs to run in the same process like REAPER to have access to REAPER's extension API. That also means, it's not possible to load it as a separate process.
The portable way
Mac OS X
- Download the portable ZIP file from the website.
- Extract the contents of the REAPER directory within the ZIP file into the REAPER directory of your portable REAPER installation.
Windows
- Download the appropriate portable ZIP file from the website.
- The ZIP file must match the architecture of your portable REAPER installation (32-bit or 64-bit).
- Extract the contents of the REAPER directory within the ZIP file into the REAPER directory of your portable REAPER installation.
Basics
Starting Playtime
By using the track template
The basic procedure for starting Playtime looks like this:
- Start REAPER
- Create a new project or open an existing one
- Insert a new track using the track template "Playtime"
Steps 1 and 2 should be familiar to you. For step 3, right click in the track header area and choose "Insert track from template => Playtime".

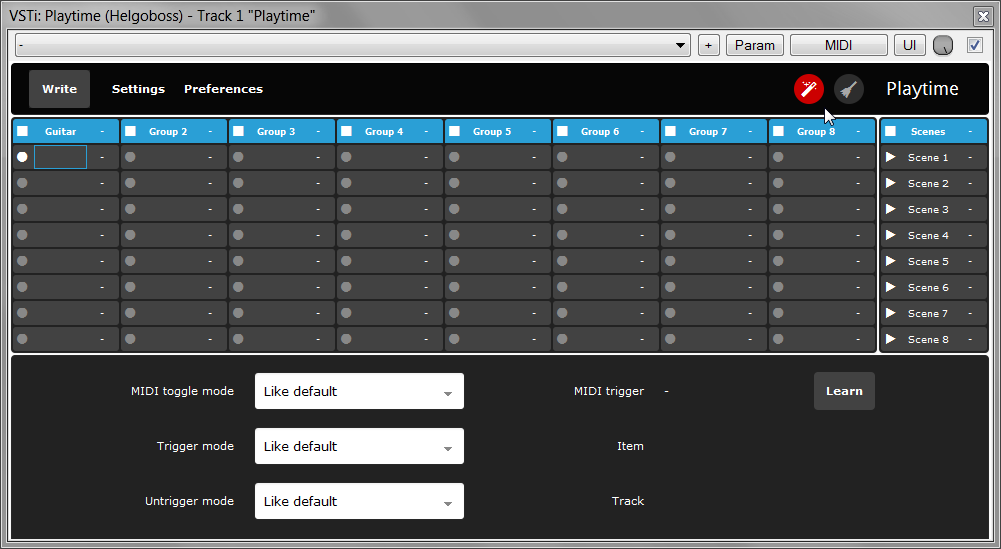
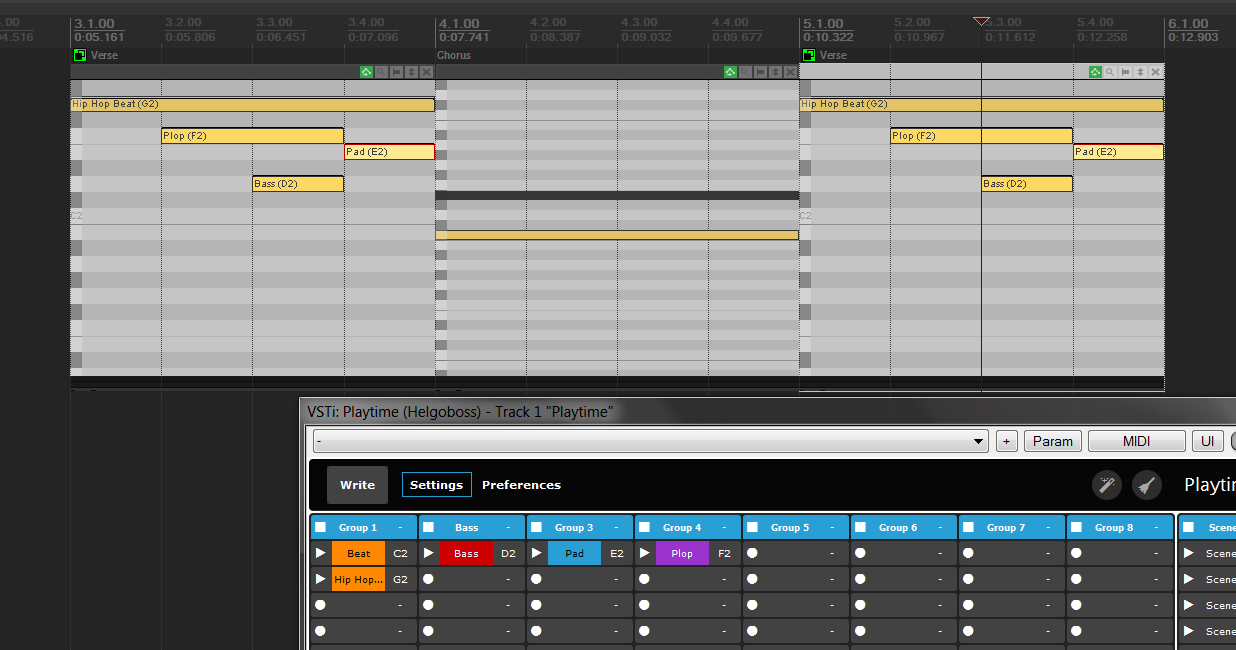
If you open the FX window of the new track, you should see something like this:
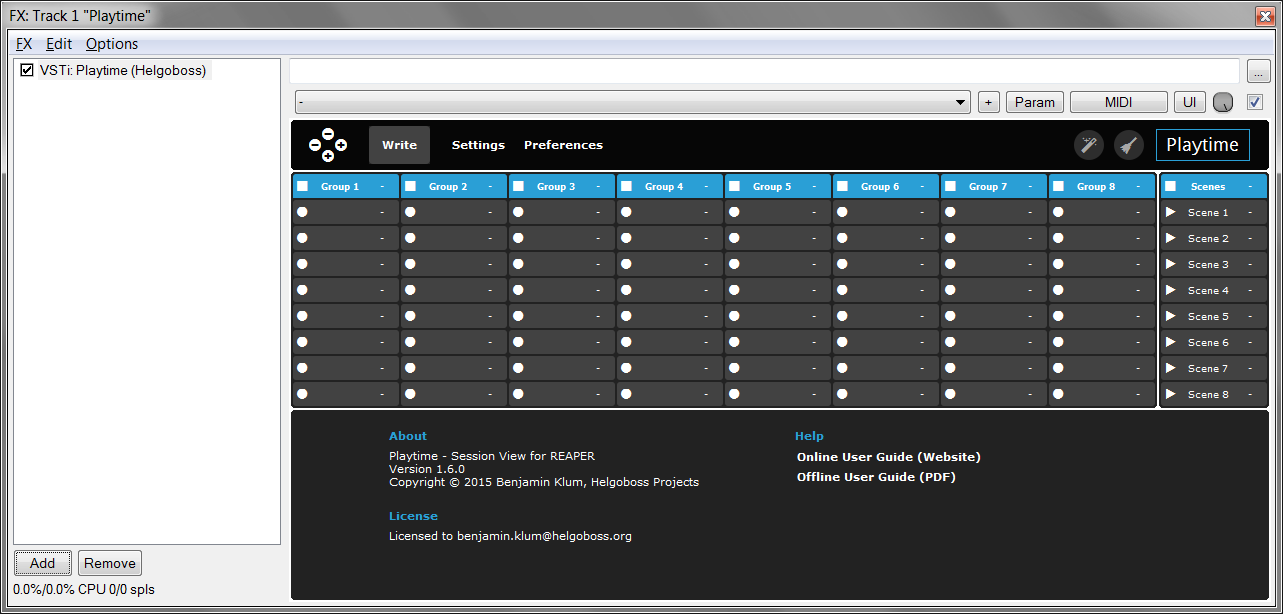
There's also a REAPER action for showing/hiding Playtime in case you want to assign a keyboard shortcut.
The screenshot shows Playtime in unlocked mode. If your Playtime runs in evaluation mode, you will see an orange "Unlock!" button in the navigation bar. Please use it for selecting your license file in order to unlock the full potential of Playtime.
Actually, the track template is just a shortcut. You can also do it the hard way:
- Right click in the track header area and choose "Insert virtual instrument on new track..."
- Choose "VSTi: Playtime (Helgoboss)"
- Right click the effect name in the FX window and activate "Send all keyboard input to plug-in"
- Arm the track (non-automatic arm)
- As a result, Playtime can be controlled via MIDI, no matter what.
- Right click the Arm button and choose "Record: disable (input monitoring only)"
- As a result, Playtime track doesn't record incoming MIDI if you hit REAPER's record button.
- Make sure, Record Monitoring (Monitor Input) is switched on
- That's necessary for Playtime's MIDI learn function.
By using the project template
For your convenience, Playtime also ships with a REAPER project template of the same name. The project template saves you some preparation but of course it's not suited for integration into existing projects. Project templates are a very individual thing, so you probably want to create your own Playtime project template sooner or later. Feel free to adapt the template to your needs. Just make sure you save it under a new name, otherwise a Playtime update might overwrite your custom template.
Use the template as follows:
- Start REAPER
- Choose "File => Project templates => Playtime"
The project template shipped with Playtime is tailored to audio recording and was built using the following receipe:
- Create an empty REAPER project
- Insert track from track template "Playtime"
- Insert tracks "Track 1" to "Track 8" and set their input to "Input: Stereo => Input 1 / Input 2"
- Set tracks to some custom colors that fit the Playtime theme
- Open Playtime
- Set "Track 1" to "Track 8" as group tracks
- Select first slot
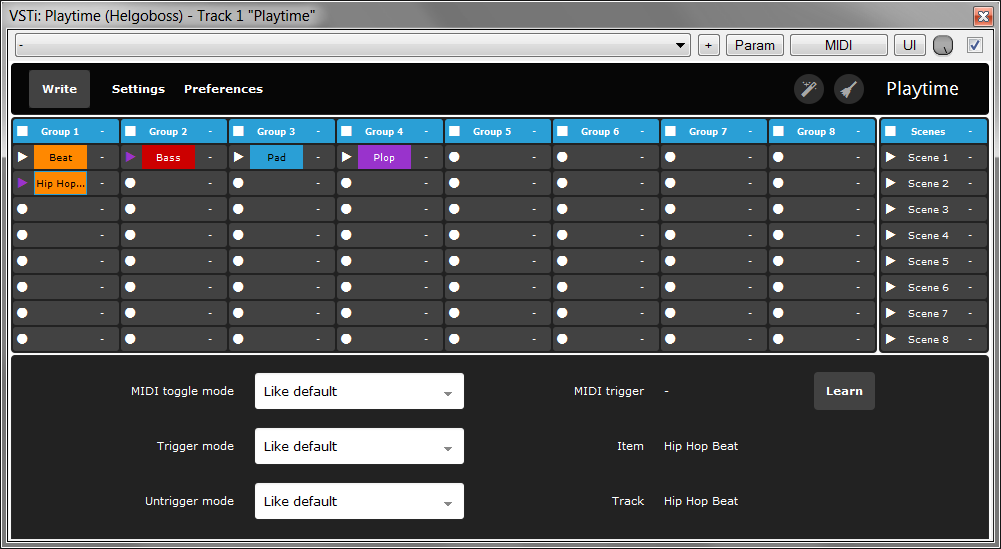
Understanding the user interface
Here's how the different parts of the user interface are called:
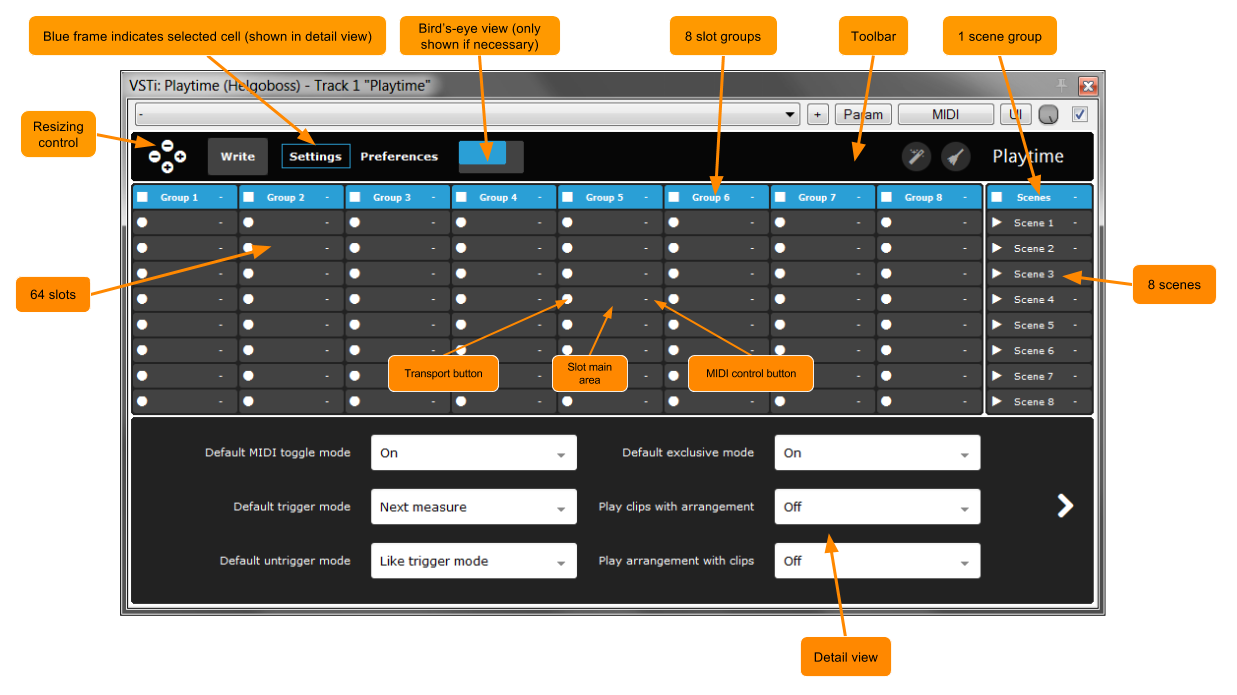
Resizing
You can resize the interface using the resizing controls in the upper left corner. Another way is to use keyboard shortcuts.
Scrolling
If there are more slots available than visible and you want to see the slots which are currently out of sight, you can either resize the user interface or scroll.
There are 4 ways to scroll:
- Drag'n'drop the blue area of the bird's-eye view
- Use the keyboard shortcuts for scrolling
- Navigate over the edge by using the cursor keys
- Use the mouse wheel (scrolls vertically only)
Docking
You can display Playtime in a REAPER docker as follows:
- Right click somewhere into the dark background area
- Enable "Docked"
This provides a better integration into REAPER than the native "Dock FX window in docker" option because it just docks the Playtime user interface, not the complete FX chain.
Full screen
You can make Playtime go full screen as follows:
- Press the full screen button (icon in navigation bar)
When in full screen mode, the resizing controls in the upper left corner control the cell scaling instead of resizing the Playtime window. You can scale the cells very large if you want. This is especially useful if you have a touch screen.
Hiding user interface elements
If you want a more seamless visual integration into REAPER or save screen space, you can hide some of the Playtime user interface elements. This is especially useful in docked mode.
- Right click somehwere into the dark background area
- In the slot area you need to right click the space between the slots. It can be a bit puzzling at times.
- Disable "Toolbar", "MIDI triggers" and/or "Detail view"
Creating clips
The whole point of Playtime is to trigger items by pressing a button, a key or a pad. You somehow need to get those items into Playtime. Items are filled into slots. As soon as an item is filled into a slot, we also refer to it as a "clip". Hence, instead of "filling a slot with an item" we can also say "creating a clip".
Note that Playtime supports any item that can be played by REAPER: MIDI, audio ... even video! But no matter the media type, Playtime makes most sense if you feed it with loops (items with "Loop source" enabled in item properties). One shots are also supported but if you want to play one shots only, you can just as well use a sampler such as ReaSamplOmatic5000. Loops need rhythmical alignment and tempo matching whereas one shots don't.
That said, there are many ways to create clips. Choose whatever suits you best.
Select a file
- Right click the main area of the slot
- Click "Fill with file..."
- Select the file
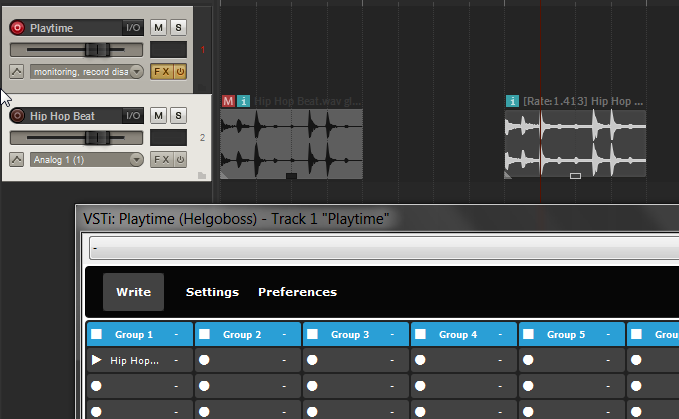
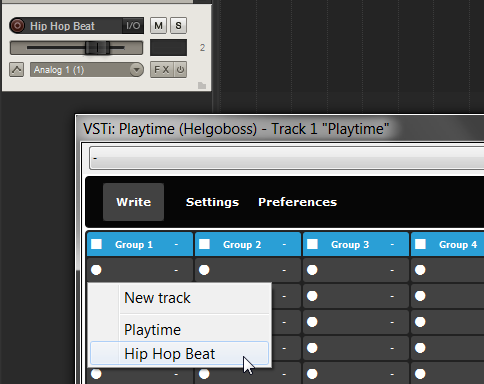
- Select the track for inserting the file

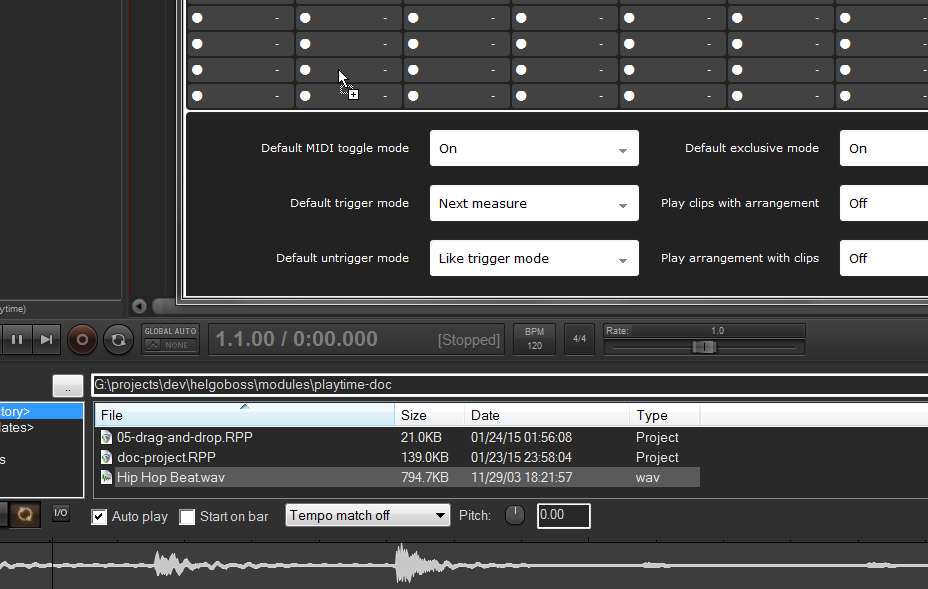
Drag'n'drop a file
- Open the REAPER Media Explorer
- Drag'n'drop a file on the desired slot
- Select the track for inserting the file
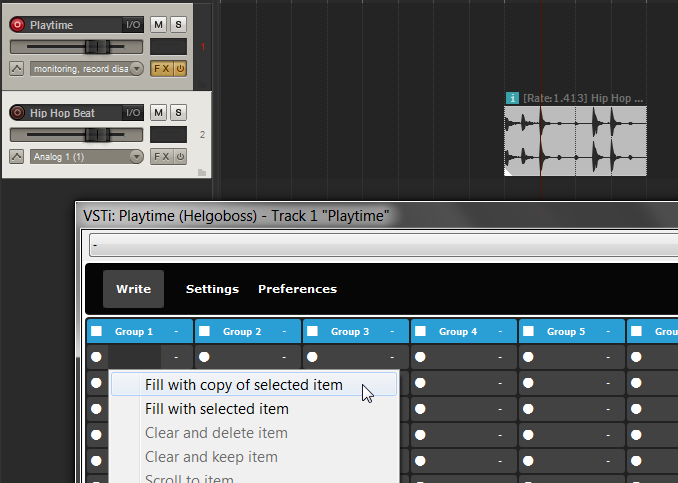
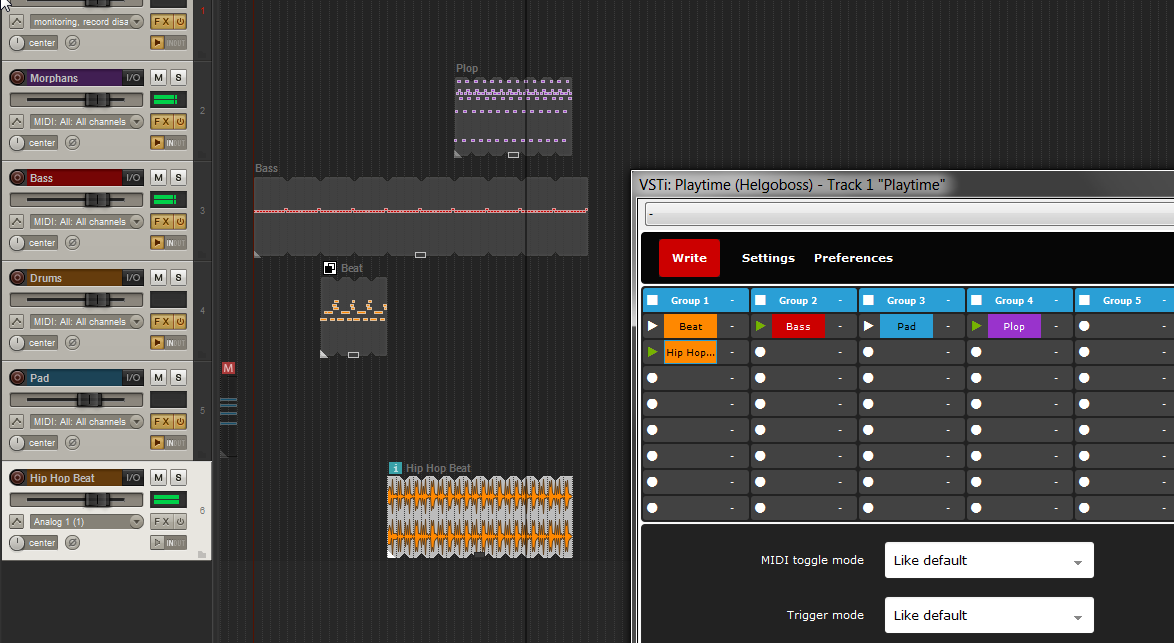
Use an existing item
- Select the desired item on the REAPER timeline
- Right click the main area of the slot
- Click "Fill with copy of selected item"
- A duplicate of the selected item can then be found at the beginning of the track, minimized to one measure and muted (we call this "stowed away"). Playtime uses the beginning of the project to store all the items which are under Playtime's control. It moves them to the correct position in realtime whenever they are triggered. It also moves them back to the beginning of the project when the REAPER stop button is pressed.
- If you click "Fill with selected item" instead, Playtime automatically removes the item from its original position to gain control over it
- By default, Playtime preserves the length and take offset of the item on the timeline even the actual take length is longer or shorter. If you don't want this, switch the option "Preserve item cut on import" in "Preferences" to "Off". In order to preserve the item cut, Playtime tries to employ REAPER source sections, by default only for audio clips. If this is not possible, it glues the item instead before importing it into Playtime.
If there are multiple selected items, the context menu entry is named "Fill column-wise with selected items". The first selected item will be filled into the selected slot, the second selected item will be filled into the slot below if it is free. If not, it will try the slot below that one etc. If there's no free slot below, the next columns will be searched for free slots. If all slots are occupied, it just stops filling. So make sure you have enough free slots available before using that function.
Record
- Create a track and prepare it for recording
- Select audio or MIDI inputs
- Add a virtual instrument or set the MIDI hardware output if desired
- There's no need to arm the track! Playtime will do it for you.
- Perhaps turn on the metronome (if you don't have another rhythmical cue already)
- Press the record button of an empty slot
- Playtime chooses the track to be recorded on by following priorities:
- Track assigned to the corresponding Playtime group
- First track armed for recording in REAPER
- Track manually chosen by user in Playtime
- Playtime chooses the track to be recorded on by following priorities:
- Record your stuff
- Press the record button again or press the REAPER stop button
- Playtime automatically crops the recording to fit into a multiple of one measure
You can record into multiple slots at the same time but only on one track at a time!
Choosing "Record: output → Record: audio (stereo)" as track input is also possible. This is especially useful for recording the output of virtual instruments (for saving system resources, for isolating the clip from future changes of instrument settings etc.). In this case, the item will end up on the Playtime track, not on the track on which it was originally recorded. The reason is simple: If it would stay on the original track, playing the clip and recording a new clip on the same track at the same time would cause the first clip to be recorded again ... which is probably not what you want.
Create an empty MIDI clip
- Double click the main area of an empty slot
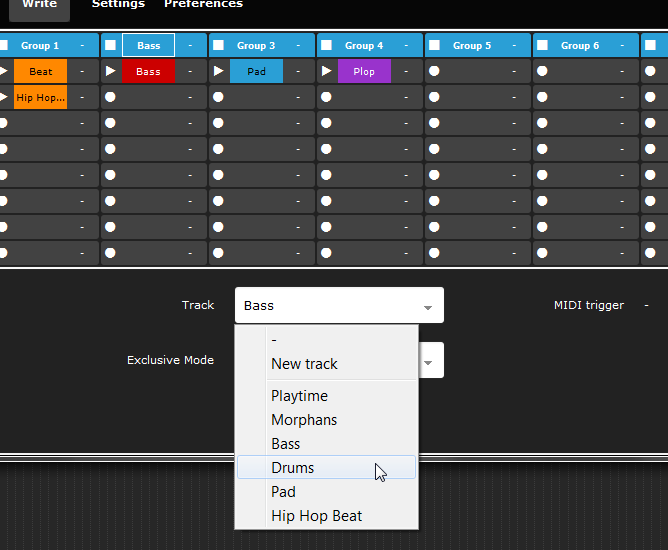
- Choose the track on which Playtime should create an empty MIDI clip. This is not necessary if a group track is set.
- Playtime automatically opens the newly created clip in the MIDI editor. If "Auto-play recorded clips" is enabled and REAPER is currently playing, it also triggers the clip.
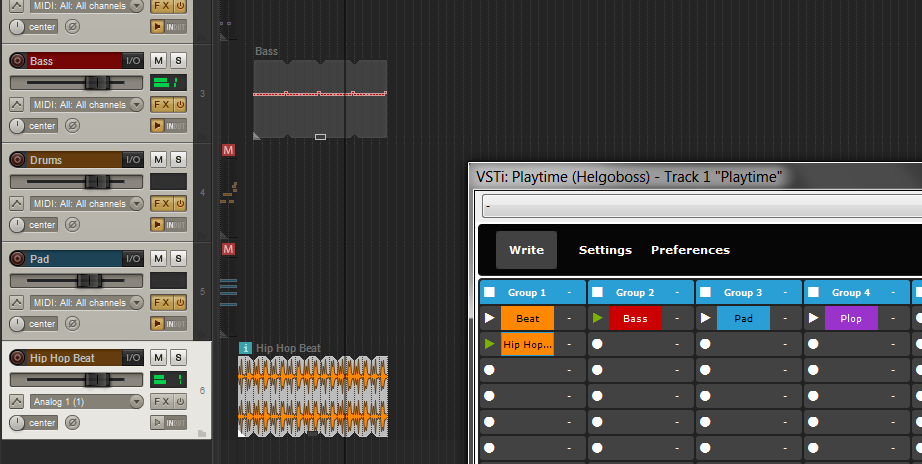
Triggering clips
Now that you have created clips, you can trigger them by pressing the corresponding play buttons. You'll realize they are played rhythmically in sync with the other clips.
By default, only one clip is played at a time in one slot group. You can press the stop button in the corresponding slot group header to stop the currently playing clip.
Go ahead, jam a little :)
If you press the REAPER stop button, Playtime memorizes the clips that were playing and indicates this by turning the white play button into a purple one. Next time you start playback by triggering a clip in Playtime, all the memorized clips are played as well. You can make Playtime forget all memorized items by pressing the scene group stop button.
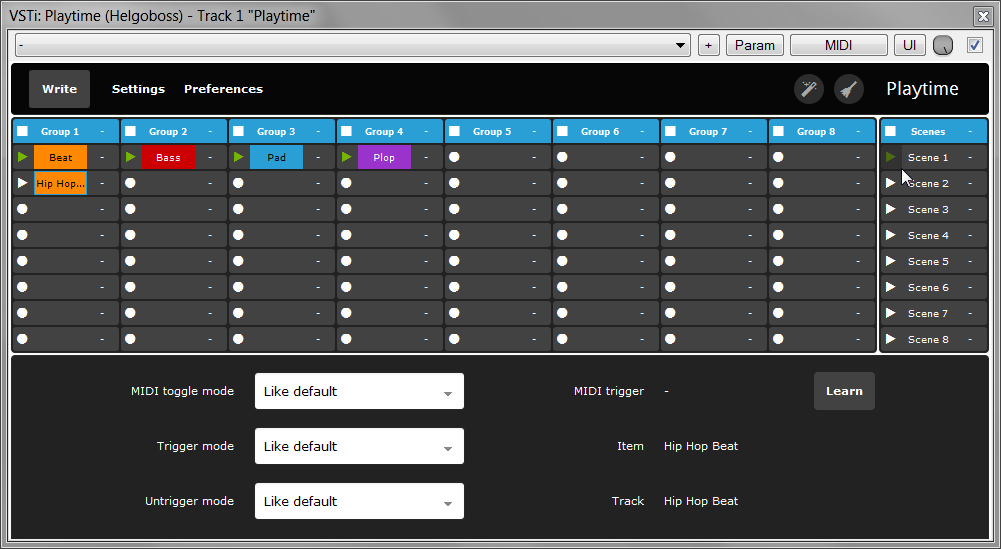
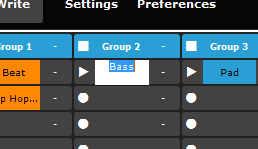
Triggering scenes
If you press the play button of a scene header, all slots in the same row will be played together.
Scenes can be used to represent different passages of your song. If you double click on the main area of a scene header, you can give it a short descriptive name (such as "Verse" or "Chorus").
You can press the stop button in the scene group header to stop all scenes and thus also all slots.
Moving, copying and deleting clips
Sometimes, you want to move a clip to another slot. You can do this by dragging it from the main area of the start slot to the main area of the destination slot. Playtime will swap the contents of the start and destination slot. Instead of drag'n'drop you can also use "Cut" and "Paste" in the slot context menu or keyboard shortcuts.
If you want to copy a clip into another slot, just hold down "Ctrl" on your computer keyboard while dragging the clip. In case of a MIDI clip this creates an unpooled copy. That means those two MIDI clips will be unconnected: If the MIDI events in one of the two MIDI clips change, the other MIDI clip is not affected. If you want a pooled copy instead, you need to hold down "Shift+Ctrl+Alt".
Attention: Playtime adopts REAPER's mouse modifiers for copying items (except if the Windows key is involved). The previous instructions assume that you haven't changed the default mouse modifiers for context "Media item" "left drag". If you have changed them, use your ones instead.
You can also use "Copy" and "Paste" in the slot context menu or keyboard shortcuts. Playtime adopts REAPER's "Pool MIDI source data when pasting or duplicating media items" option. So if this option is checked, pooled MIDI copies are created, otherwise unpooled ones.
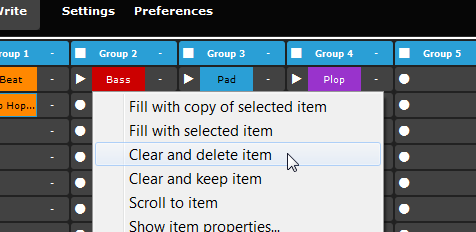
If you want to delete a clip, right click the slot. You have two options:
- Clear and delete item
- Removes the clip from the slot and deletes the corresponding item from the timeline
- This is also available as keyboard shortcut.
- Clear and keep item
- Removes the clip from the slot but leaves the corresponding item on the timeline
Moving and copying scenes and groups
Not only single slots can be moved or copied, also complete scenes and groups.
If you want to swap two scenes including their slots, drag the start scene to the destination scene. Alternatively you can use "Cut" and "Paste" in the scene context menu or keyboard shortcuts. The same goes for groups.
If you want to copy a scene, hold down "Ctrl" on your computer keyboard while dragging the scene. Alternatively you can use "Copy" and "Paste" in the scene context menu or keyboard shortcuts. Attention: The destination scene will be overwritten! Mouse modifiers and MIDI pooling behavior are analogous to slot copying. The same goes for groups.
Adding and removing scenes or groups
Need more scenes and slots? You can easily add new ones:
- Right click the scene main area
- Choose "Insert 1 above" or "Insert 1 below"
- Playtime inserts an empty scene
- If you cannot see it, resize the user interface or scroll
You can also delete a scene:
- Right click the scene main area
- Choose "Delete scene"
- Attention: All slots in that scene including their corresponding items will be deleted
The same is possible for groups.
Building scenes
If you find yourself listening to a very nice combination of clips, you might want to save that combination. You can do that by building a scene from the currently playing clips.
- Select an empty scene
- Right click the scene main area
- Choose "Build from playing clips"
- All currently playing clips will be copied into the scene
Recording your Playtime performance
If you want to perpetuate your performance on the timeline, press the "Write" button and perform again. Every clip you trigger is written to the timeline then.
This way, you can easily sketch your arrangement.
If you use MIDI controllers, there's also an alternative way of recording your performance.
Advanced usage
Editing clips
Infact, clips are regular REAPER items. In other words, you can modify them in any way possible using REAPER itself, such as:
- Changing the notes of a MIDI item using the MIDI editor
- Applying a take envelope (for example a volume or pitch envelope)
- By the way, Playtime automatically loops take envelopes (if they don't exceed the take length)! That feature turns take envelopes instantly into a powerful tool for modifying loops in a non-destructive way. REAPER natively doesn't loop them.
- Reversing the active item take
- Changing the playrate
- Applying a fade in or fade out
- Renaming the active take
- ...
Any clip which is currently not playing is located at the beginning of the project, minimized to one measure and muted. Hence, it doesn't get in your way but it's always there if you want to modify it.
Of course, it's tedious always having to search the item on the timeline. That's why Playtime offers some convenience features:
- Rename clip (infact the item's active take)
- Right click the slot main area
- Choose "Rename..."
- Enter the new name and press enter
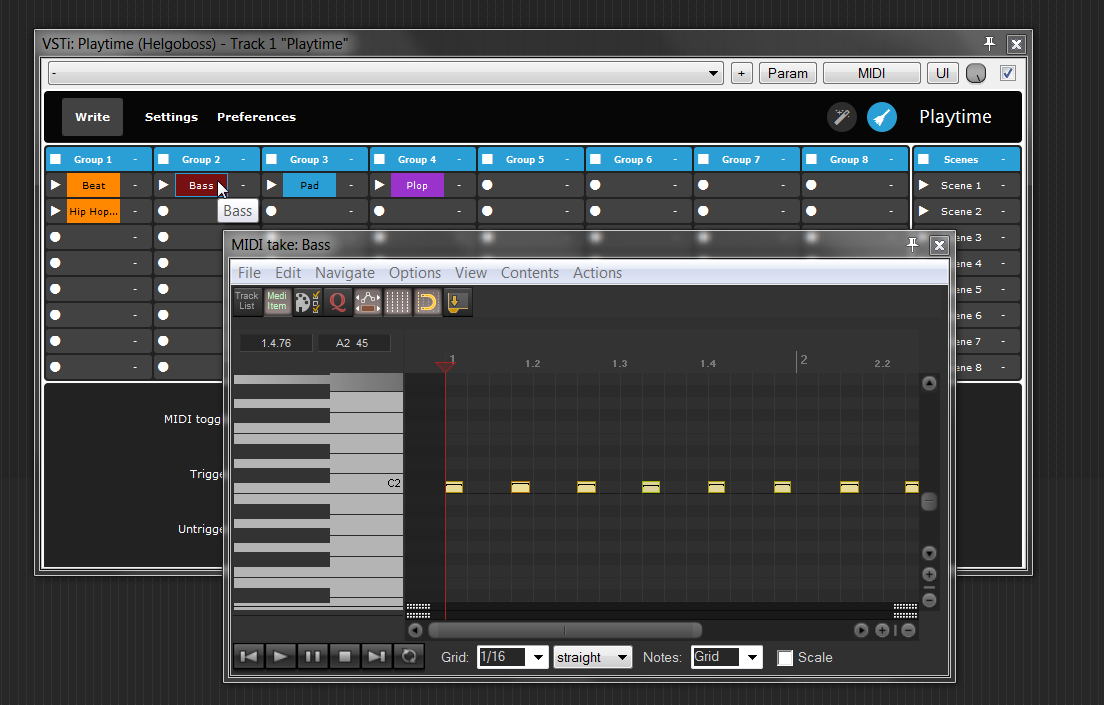
- Open MIDI editor (piano roll)
- Double click the main area of a slot containing a MIDI clip
- As long as you don't press the "Leave edit mode" button, Playtime doesn't stow away the MIDI item on transport stop (which it would otherwise do).
- Open audio editor
- Double click the main area of a slot containing an audio clip
- There is no floating audio editor in REAPER, so the item just gets zoomed. As long as you don't press the "Leave edit mode" button, Playtime doesn't stow away the audio item on transport stop (which it would otherwise do).
- Open item properties
- Right click the slot main area
- Select "Item Properties..."
- Open FX window of the track on which the item is located
- Right click the slot main area
- Select "Show track FX..."
- Scroll to the item
- Right click the slot main area
- Choose "Scroll to item"
- Glue clip (for example to apply effects and take envelopes in a destructive way)
- Right click the slot main area
- Choose "Glue"
As soon as you double-click a slot to open the contained clip in the audio or MIDI editor, Playtime puts the clip into a so called "edit mode". As a result, Playtime doesn't stow away the clip if you press the REAPER stop button (which it would normally do in order to keep the timeline clean). Not stowing away the clip in edit mode is good because otherwise you wouldn't be able to get hold of the item on the timeline. It would just suddenly disappear. This feature also enables you to edit several clips in relation to each other.
Whenever at least one clip is in edit mode, the "Leave edit mode" button (the broom icon) lights up in blue. Pressing this button switches off edit mode for all clips. It also stows away all clips in edit mode that are not currently playing.
If a clip is in "edit mode", Playtime also prevents it from being played with the arrangement when pressing the REAPER play button.
Cropping clips
Basics
Sometimes you might want to play and loop only a small portion of the clip instead of the whole thing. One way to do this is to adjust the start and length of the item on the timeline and then glue it. However, this requires quite much user interaction. Besides, glueing has the disadvantage that it's a destructive operation. You can't just go back to the whole clip later, at least not without some effort.
That's why Playtime offers convenient access to a feature that is already baked into REAPER itself: Sections. As its name suggests, this feature makes it possible to play only a sub section of the complete audio or MIDI material. In REAPER itself, sections are a little bit hard to use. In Playtime, it's only a matter of a few mouse clicks because it's a very important feature for loop-based music production.
Adjusting section using context menu
Here's how you adjust the start of the section using the slot context menu:
- Right click the slot main button and hover the mouse over "Section start position"
- Choose the beat on which the section should start
- That's it! The change applies immediately, also to currently playing clips.
- Please note that changing the section start position doesn't change the length of the section. If you don't change the length yourself, you will naturally have silence at the end of the section.
Adjust the length of the section:
- Right click the slot main button and move the mouse over "Section length"
- Choose the number of beats
- The last beat that belongs to the original audio or MIDI material is marked as "end of source". That way you can easily recognize if silence is added to the end of the section or not.
In both submenus, the current value is indicated by a checkmark. If you have done adjustments of the section length on a millisecond basis (see below), the current value might also be located between to beats.
Timebase considerations
You might see the following text when hovering the mouse cursor over the section context menu entries:
Only available for items with timebase "Beats (position, length, rate)"
Which means that at some point in the past you assigned this item the timebase "Time" or "Beats (position only)". You basically told REAPER that this clip doesn't contain rhythmic material. In this case, adjusting the section by selecting beats in the context menu obviously doesn't make sense. You would rather need a possibility to fine-tune the section by adjusting it by milliseconds (see below).
If you think the timebase of this clip is wrong and it actually contains rhythmic content, go ahead and change it to "Beats (position, length, rate)":
- Right click on slot main button
- Select "Show item properties..."
- Set "Item timebase" to the correct value
Limitations of MIDI clip sections
Officially, REAPER supports sections for audio items only. Playtimes also uses them for MIDI items. It works quite nicely but there are some side effects:
- Double clicking the item on the REAPER timeline doesn't open the MIDI editor (it does in Playtime though)
- A cropped clip is still always displayed full-length in the MIDI editor so the MIDI editor cursor doesn't reflect the current playing position within the clip
- MIDI notes in the cropped clip might not be visible in the arrange view
Don't worry, in order to get rid of these side effects, you can always go back to a pure MIDI item without section by applying the section or removing it. See below.
Applying section
As soon as you are satisfied with the cropping result, you could apply the section. You don't have to! In fact, we recommend you to just keep the section around because then you can go back to the whole clip at any time. Applying the section is a destructive operation. It effectively glues the item and results in a normal item without section.
- Right click on slot main button
- Select "Apply section (glue)"
Removing section
If you want to undo the cropping without applying it, do this:
- Right click on slot main button
- Select "Remove section"
Adjusting section using buttons or keyboard shortcuts
Playtime offers following REAPER actions related to sections:
- Increase section start position of selected item
- Decrease section start position of selected item
- Increase section length of selected item
- Decrease section length of selected item
You can find them via "Actions => Show action list...". You can map those actions to keyboard shortcuts or buttons as you wish.
Even non-rhythmical items with timebase "Time" or "Beats (position only)" can be adjusted that way. In that case the actions increase/decrease the value by one millisecond.
Adjusting section using controllers
If you want to use MIDI controllers (e.g. rotary endless decoders or absolute knobs) to crop the currently selected clip, use these automation parameters:
- Selected slot section start position
- Selected slot section length
Adjusting section using REAPER itself
It is also possible to use REAPER itself to change the section parameters. Just open the item properties, enter values for "Section" and "Length" parameters and press "Apply" or "OK".
Setting an anacrusis
A very frequently used element in both classical and modern music is the so called anacrusis or pickup. An anacrusis is the part of a composition that comes before the first downbeat - it virtually has the function of a very short introduction or "inhaling" before starting with the "real thing".
Playtime translates this concept to loops. The anacrusis starts somewhere at the end of the loop and stops at the actual beginning of the loop - the first downbeat. Here's how Playtime deals with anacrusises in detail:
- When triggering a clip with anacrusis early enough, Playtime starts playing it already before the beginning of the measure. In particular, it starts by playing the anacrusis (the part at the end of the clip).
- Likewise, when untriggering the clip early enough, Playtime stops playing it already before the end of the measure. In particular, it omits the anacrusis (because it's sole musical function is to serve as bridge to the beginning of the loop - not as end).
Defining the anacrusis portion of a clip is easy:
- Right click on the slot main button and hover your mouse over "Anacrusis length"
- Select the desired anacrusis length in beats
- If you don't see any beats here, read about timebases.
- Make sure the play start and stop times for the slot are set to "Next measure"
This is a small but very effective feature to make your loop-based music sound less rigid and more musical.
Assigning tracks to groups
You've probably realized that Playtime asks you to select a track every now and then. That bothers. But there's a solution. You can set a default track for each slot group, we call it "group track":
- Click the main area of the slot group header
- Select the desired group track in the detail view
- Playtime won't ask you anymore to select a track for slots in that group
- Additionally, if you double click the group main area, the group track will be selected.
There's also another way to set a group track:
- Select the desired group track in REAPER
- Right click the main area of the slot group header and choose "Use selected track as group track"
Renaming groups
If you don't like the automatically generated group name, you can change it.
- Right click the group main area
- Choose "Rename..."
- Enter the new name and press enter
If you enter an empty string, the name will revert to the automatically generated one.
MIDI overdubbing
Sometimes you don't want to record a completely new MIDI clip but just add some more notes to an existing one.
- Right click the main area of a slot that contains a MIDI clip
- If you don't have a MIDI clip yet and want to start from scratch, just double click the main area before that. That creates an empty one-measure-long MIDI clip.
- Choose "MIDI overdub"
- The MIDI clip will play in a loop while you can add more MIDI material step by step by playing on your keyboard
- When you are finished, press the REAPER stop button
Using tempo detection
Recording loops with Playtime works quite nicely if you play along with an already existing tempo-aligned loop. But what if you want to start from scratch? If you don't have any rhythmical cue, it's hard to get the loop right. One way to approach this is to switch on the metronome so you can match your playing with the current project tempo.
However, you can also do it the other way around: You can make the project tempo match your playing. This gives you the freedom to follow your musical tempo feeling. Here's how you do it:
- Select the slot into which you want to record
- Make sure a group track is set for the corresponding group (this track will be used for recording)
- Press the tempo detection button (the magic wand in the navigation bar)
- This already starts recording internally. But don't worry. This is just a "warm up" and makes sure that the actual recording (in step 5) can be captured from the first moment on, without any latency.
- This already starts recording internally. But don't worry. This is just a "warm up" and makes sure that the actual recording (in step 5) can be captured from the first moment on, without any latency.
- Get ready. Listen to the "metronome in your head"
- Playtime automatically switches off the REAPER metronome so you don't get distracted by it.
- As soon as you are ready and the metronome in your head announces "measure 1, beat 1", hit the record button of the selected slot and start playing.
- As soon as you have finished playing, hit the record button again, in particular exactly on the end of the last measure.
- Playtime detects the tempo of your recording based on its length and immediately adjusts the REAPER tempo accordingly.
This procedure sounds probably more difficult than it is. Just try it a few times.
It's advisable to press the slot record button (steps 5 and 6) remotely using a foot pedal because it's better to have your hands free for playing. You can achieve that by using the automation parameter "Record Selected Slot".
The selected slot is saved with your project. That means you can easily create a personal REAPER project template that allows you to start jamming by just clicking the Playtime tempo detection button, step 1 and 2 not being necessary anymore.
You can combine tempo detection with the "Auto-play recorded clips" feature to get looper-like behavior.
In case you think Playtime's detected tempo is way too low or way too high, you might want to adjust the "Minimum BPM" and "Maximum BPM" values in "Preferences". Playtime tries to keep the tempo within that range. Example: If the configured range is 60bpm to 180bpm and Playtime initially calculates 45bpm, it will double the detected tempo to 90bpm (which it can safely do by assuming that the recorded clip is two measures long instead of only one).
Using a MIDI controller
The real fun begins as soon as you treat Playtime like a musical instrument. You can trigger clips using any MIDI controller. Playtime supports both MIDI note and MIDI CC messages.
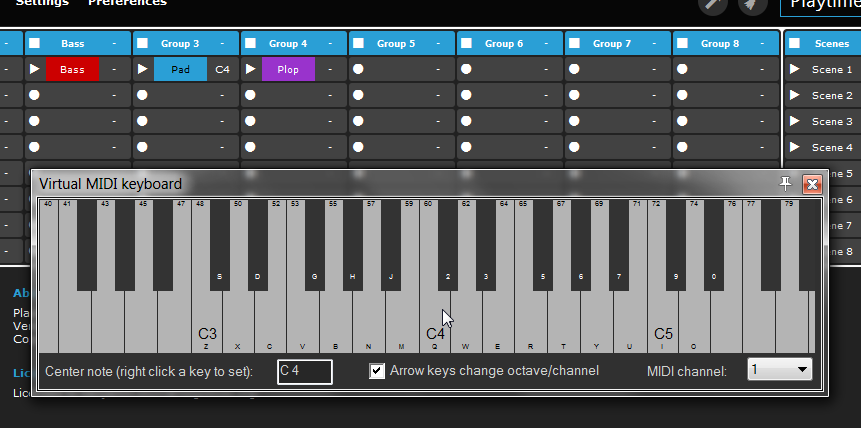
Generic MIDI controller
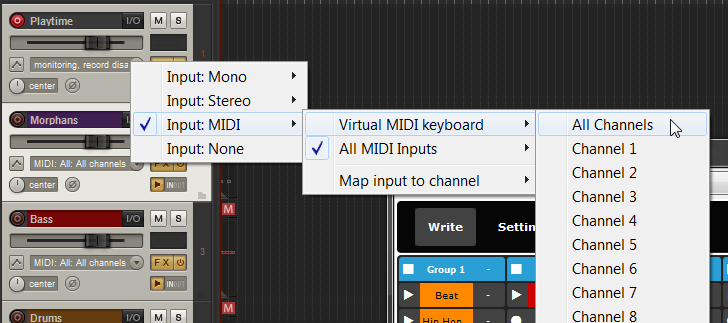
Let's start with your MIDI keyboard. Connect it to Playtime by setting it as MIDI input device for the Playtime track.
Then proceed as follows:
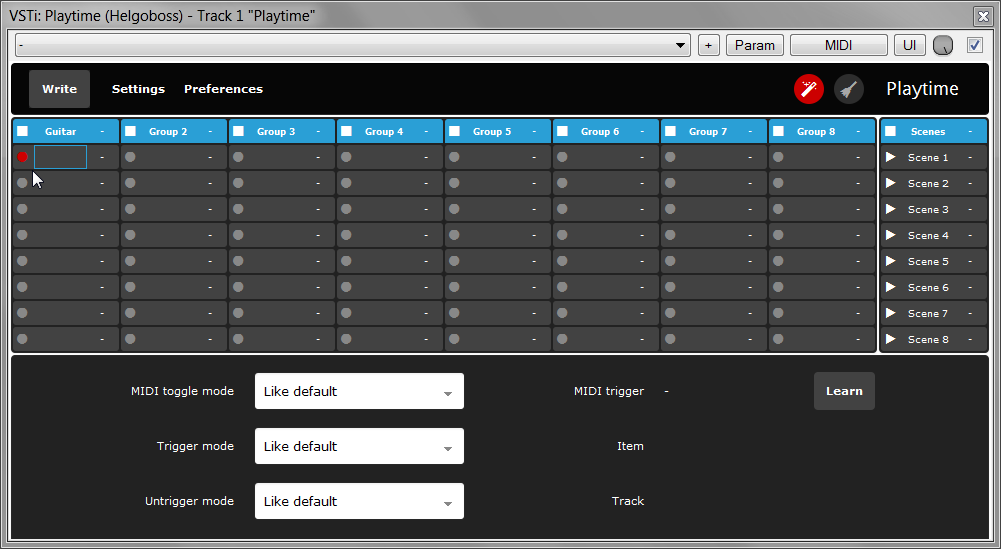
- Click the MIDI control button of the slot you want to control (by default contains a dash "-")
- The button lights up red and changes to an "L" ( as in "Learn")
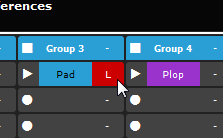
- Play a key on your MIDI keyboard
- The red light turns off and the name of the note you played can be seen instead
- Now you can control the slot with that key
You can do the same things for scenes and groups.
You can remove an assignment as follows:
- Right click the main area of the slot, scene header or group header
- Select "Clear MIDI trigger"
Visual feedback with grid controllers such as Launchpad
There are MIDI controller devices tailored to specifically our use case, the most famous probably being the Novation Launchpad. A great advantage of those devices is that they give you visual feedback. By looking on the device, you can see immediately which slot is filled, which one is currently playing, which one will be played in a moment and which one is going to stop in a moment.
Some devices, for example the Launchpad, have exactly 8 x 8 pads for triggering clips - a perfect match for Playtime's default setting.
To set up visual feedback, proceed as follows:
- Click "Settings"
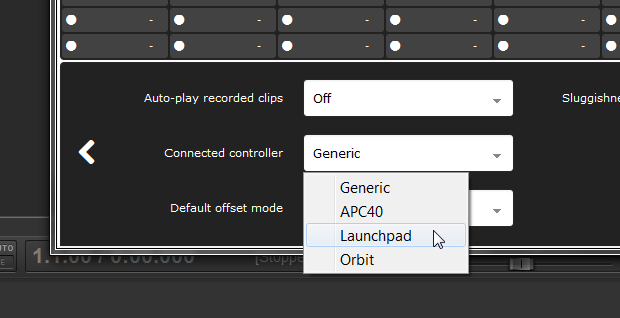
- Navigate to the 2nd page of the detail view by clicking the right arrow
- Choose one of the supported devices in the "Connected controller" dropdown menu.
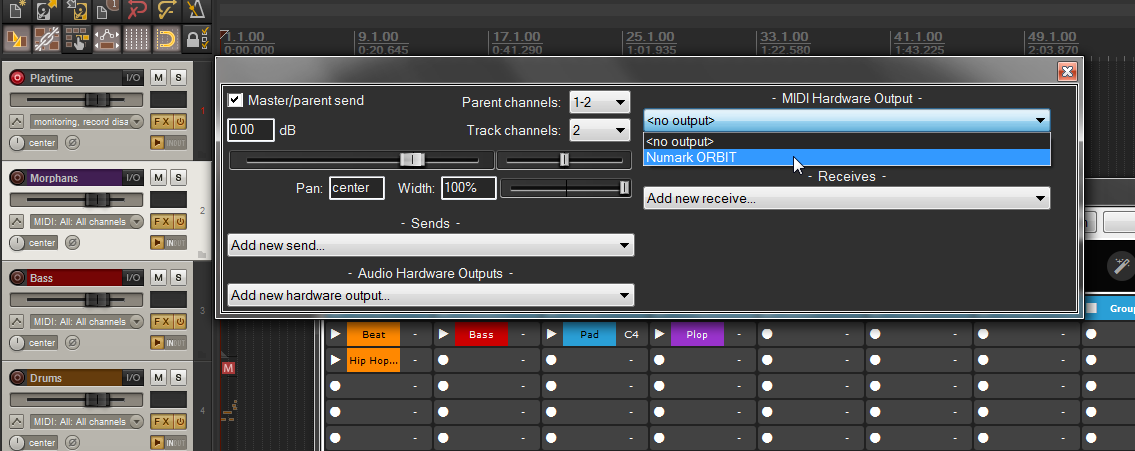
- Click the "I/O" button of the Playtime track
- Set the device as MIDI Hardware Output
- Start playback in REAPER and stop it again
- The device should now indicate which slots are filled.
- If it doesn't seem to work, make sure you have selected the correct controller in Playtime and allowed it to overwrite the current MIDI triggers.
If you can't find your controller device in the list, try "Launchpad" and the others. Maybe one of them is compatible with your device.
Tip: In case you experience orphaned or misplaced lights on the Launchpad, try to click the broom icon in the toolbar (when it's not lighted up in blue). This will reset the Launchpad.
Currently supported controllers
Triggering clips with visual feedback is supported on all listed controllers. Features beyond that might not.
Tested:
- AKAI APC Key 25
- AKAI APC mini
- AKAI APC40 MK2
- AKAI APC40
- Novation Launchkey Mini
- Novation Launchpad
- Novation Launchpad Mini
- Novation Launchpad MK2
- Novation Launchpad Pro
- Numark Orbit
Untested (contributed by community):
- Push (in User Mode and with PXT-General)
MIDI performance recording and piano roll
If you use a MIDI controller to control Playtime, you have another option to record your Playtime performance in addition to the "Write" button: Boringly normal MIDI recording. Remember, Playtime is a virtual instrument. You can "play" it and record your playing.
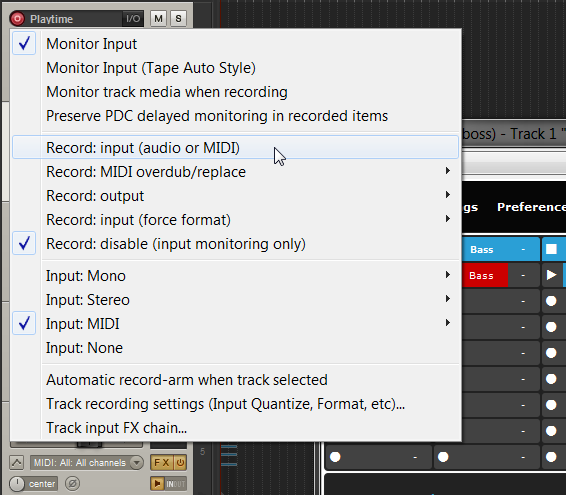
- Right click the record button of the Playtime track
- Select "Record: input (audio or MIDI)"
- Hit REAPER's record button
- Use your MIDI controller to trigger some clips
- Stop the recording
- Voilá. There should be a new MIDI item on your Playtime track. If you now hit REAPER's play button, you should hear and see the clips being triggered as you recorded it.
One benefit of this kind of recording is that the triggered clips are not yet persisted on the timeline. The arrangement is there but it is still very dynamic. During playing, the items will be placed on the timeline in realtime and removed from it as if by magic.
You can modify the MIDI item on the Playtime track in all the common ways:
- Time strech the item to make everything play twice as long
- Split it into several items
- Copy'n'paste those items
- ...
In this way, you can sketch your complete arrangement just by working with some "high-level" MIDI items on the Playtime track! Yes, let's call them like that: High-level MIDI items.
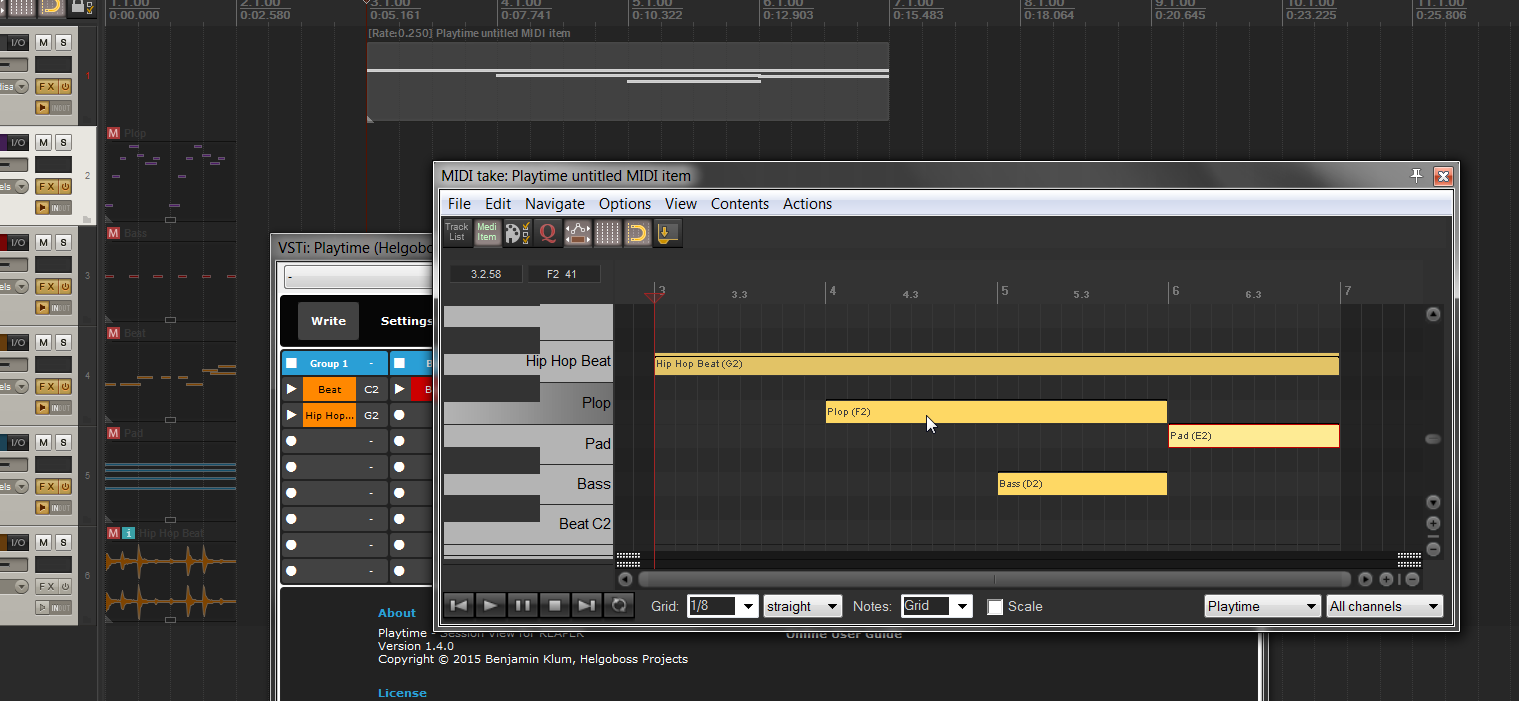
Here's a hint for using the piano roll to edit high-level MIDI items:
- Double-click the high-level MIDI item to open the piano roll
- In the piano roll, select "View => Piano roll notes => Show note names on notes"
- Now you can see the name of the triggered slot item directly on the note
Just think of what you can do by using pooled high-level MIDI items, for example: Let's say you have a high-level MIDI item that represents the chorus of your song. You want to have it 3 times in your complete song. So you go and create 3 pooled copies of that item. Now, whenever you change one chorus, the other ones are also automatically changed.
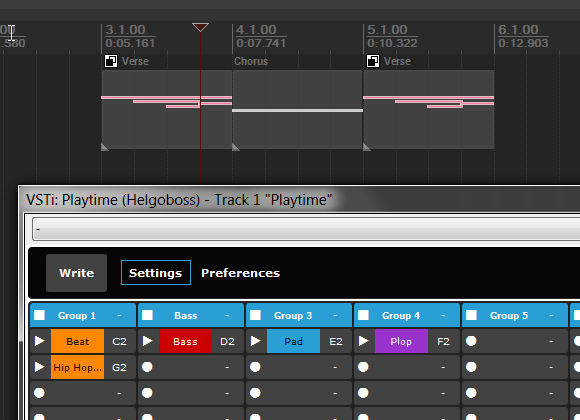
Or use the inline MIDI editor:
You can take all that to a next level by controlling one Playtime instance by another one using high-level MIDI items. This is actually a new and interesting alternative to scenes. Scenes are somewhat easier to grasp though and always at your fingertips.
Please note that before you render your complete project to an audio file, you have to record everything using the "Write" button as described here.
Changing the default behavior
By default, Playtime behaves much like Ableton Live. You can change various aspects of that behavior.
Exclusive mode
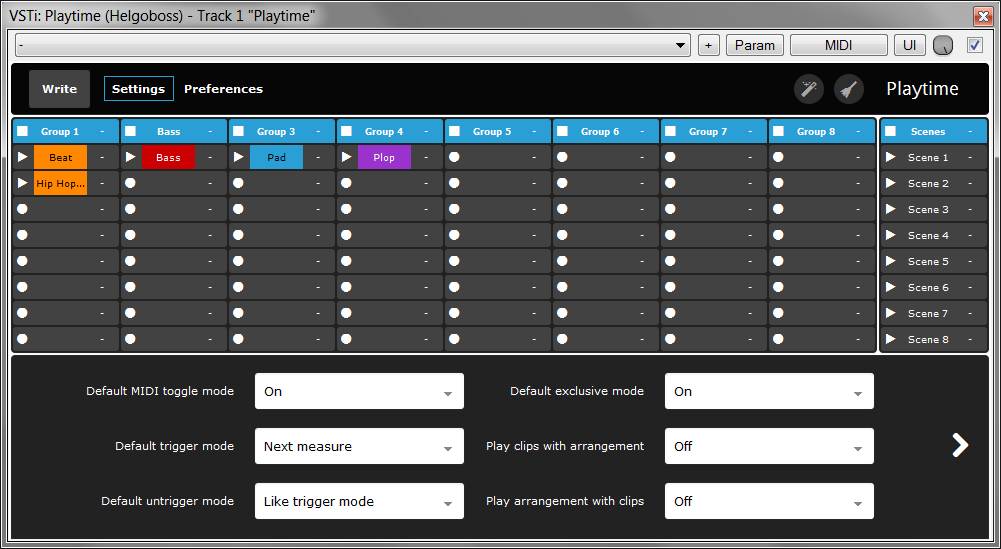
By default, the exclusive mode is "On". That means, only one clip is played at a time in one slot group. That's quite useful if you have multiple variations of the same clip and you want to switch between them.
You can set exclusive mode to "Off":
- Click "Settings"
- Select "Off" in the "Default exclusive mode" dropdown
If exclusive mode is "Off", multiple clips in one slot group can be played at the same time. Also, if a clip is playing and you want to stop that particular one, just press its play button again. If you do that while exclusive mode is "On", the clip will be retriggered instead of being stopped.
Now you know how to set the exclusive mode for all groups together. You can also overwrite that setting for specific groups:
- Click the main button of a group
- Change the exclusive mode in the detail view
Play start time
By default, the play start time is "Next measure". Which means that whenever you trigger a clip, Playtime will start playing it on the next measure, not immediately. That causes loops to be nicely rhythmically aligned, which is probably what you want.
If it is not what you want, you can change it to "Next beat" or even "Immediately". "Next beat" can be useful for rhythmic experiments while "Immediately" is well-suited if you want to go crazy or trigger one shots instead of loops.
Here's how you change the default play start time:
- Click "Settings"
- Select the desired mode in the "Default play start time" dropdown
Note that even if you set "Next Measure", Playtime in some cases plays your clip immediately. First case: If you trigger the clip exactly on the start of the measure (which is very unlikely though). Second case: If you trigger it shortly after the start of a measure. In the second case, Playtime assumes you were just a moment too late. It forgives you the little inaccuracy by placing the item on the start of that measure, effectively not playing the clip from the beginning but some milliseconds later. See section Sluggishness tolerance for learning how to configure this behavior.
Play stop time
If you cause a clip to be played, we call it triggering. If you cause a clip to be stopped, we call it untriggering.
You can tell Playtime when it should stop clips. By default, the play stop time is set to "Like play start time", meaning the play stop time goes hand in hand with the play start time. For example, if the play start time is "Next measure", whenever you untrigger a clip, the clip will also stop on the next measure.
There's one additional play stop time: "Clip end". If you select that one, the clip plays until its end. Please note that you don't need this setting if you deal with a one shot.
You can change the default play stop time analogously to the default play start time.
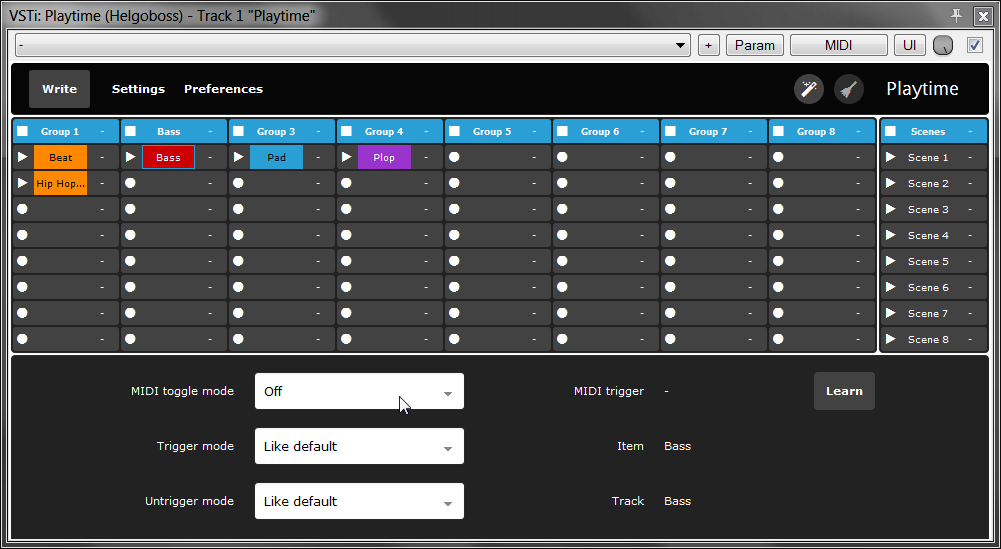
MIDI toggle mode
By default, the MIDI toggle mode is "On". In that case, pressing and releasing a key on your MIDI keyboard triggers the clip. Pressing it again untriggers it. Or, if exclusive mode is enabled, it retriggers it. There's only one exception to the latter rule: If trigger action is 'Record/play -> Stop/retrigger' but no MIDI trigger is assigned to the group for stopping the group, pressing the key again still untriggers the clip - although exclusive mode is enabled! Because otherwise there would be no way to stop an already playing clip.
If you want that releasing the key untriggers the clip instead, you can set MIDI toggle mode to "Off" (usually feels more natural for one shots):
- Click "Settings"
- Select "Off" in the "Default MIDI toggle mode" dropdown
The MIDI toggle mode is also applicable to scenes.
Offset mode
You can tell Playtime from which position inside the clip to start when triggered. This position is called "offset". By default, the offset mode is "Reset".
Here's the list of offset modes:
| Name | Description |
|---|---|
| Reset | Default setting. Whenever you trigger the clip, it starts from zero. |
| Continue | On the first triggering, the clip starts from zero. On each subsequent triggering, it resumes the clip from where it left off when you untriggered it. |
| Relative gate | On the first triggering, the clip starts from zero. On each subsequent triggering, the clip starts as if it would never had been stopped. This sounds like a gate effect. This works best with play start and stop time "Immediately" and disabled exclusive mode. |
| Absolute gate | This is like "Relative gate" but it acts like a gate already on the first triggering. It basically synchronizes your clip to the measure. It's like starting the clip in muted state already on the beginning of the project (or more exactly the previous tempo marker) and unmuting it whenever it's triggered. |
Here's how you change the default offset mode:
- Click "Settings"
- Select the desired mode in the "Default offset mode" dropdown
Per-slot/per-scene settings
Now you know how to set play start time, play stop time, MIDI toggle mode and offset mode for all slots together. You can also overwrite that setting for specific slots:
- Click the main button of a slot
- Change the desired settings in the detail view
The same can be done for scenes.
Auto-play recorded clips
By default, Playtime's record function fills the slot with the recorded clip and immediately starts playing it. If you disable "Auto-play recorded clips", the recorded clip will not be triggered automatically anymore:
- Click "Settings"
- Navigate to the 2nd page of the detail view by clicking the right arrow
- Select "Off" in the "Auto-play recorded clips" dropdown
With the auto-play feature turned on you can use Playtime like a looper.
Play clips with arrangement
If playback is stopped and you hit the play button in REAPER, Playtime by default doesn't play the clips which were playing when playback was stopped the last time. You can tell Playtime to do just that:
- Click "Settings"
- Select "On" in the "Play clips with arrangement" dropdown
Play arrangement with clips
If playback is stopped in REAPER and you trigger a clip, Playtime by default plays the clip without the existing arrangement on your REAPER timeline (by jumping to the end of the project). You can tell Playtime to play the arrangement as well by playing right from the current edit cursor position:
- Click "Settings"
- Select "On" in the "Play arrangement with clips" dropdown
Sluggishness tolerance
If play start time is "Next measure" or "Next beat" and you trigger a clip a few milliseconds after the start of a measure or beat, Playtime by default assumes that you wanted to trigger exactly on the start of the measure or beat. So the clip starts playing immediately, correctly aligned to the measure. We call this "sluggishness tolerance".
You can adjust the sluggishness tolerance:
- Click "Settings"
- Navigate to the 2nd page of the detail view by clicking the right arrow
- Adjust the value for "Sluggishness tolerance" with your mouse wheel or enter a value with your keyboard.
- If you change it to "0 ms", Playtime becomes ... well ... intolerant
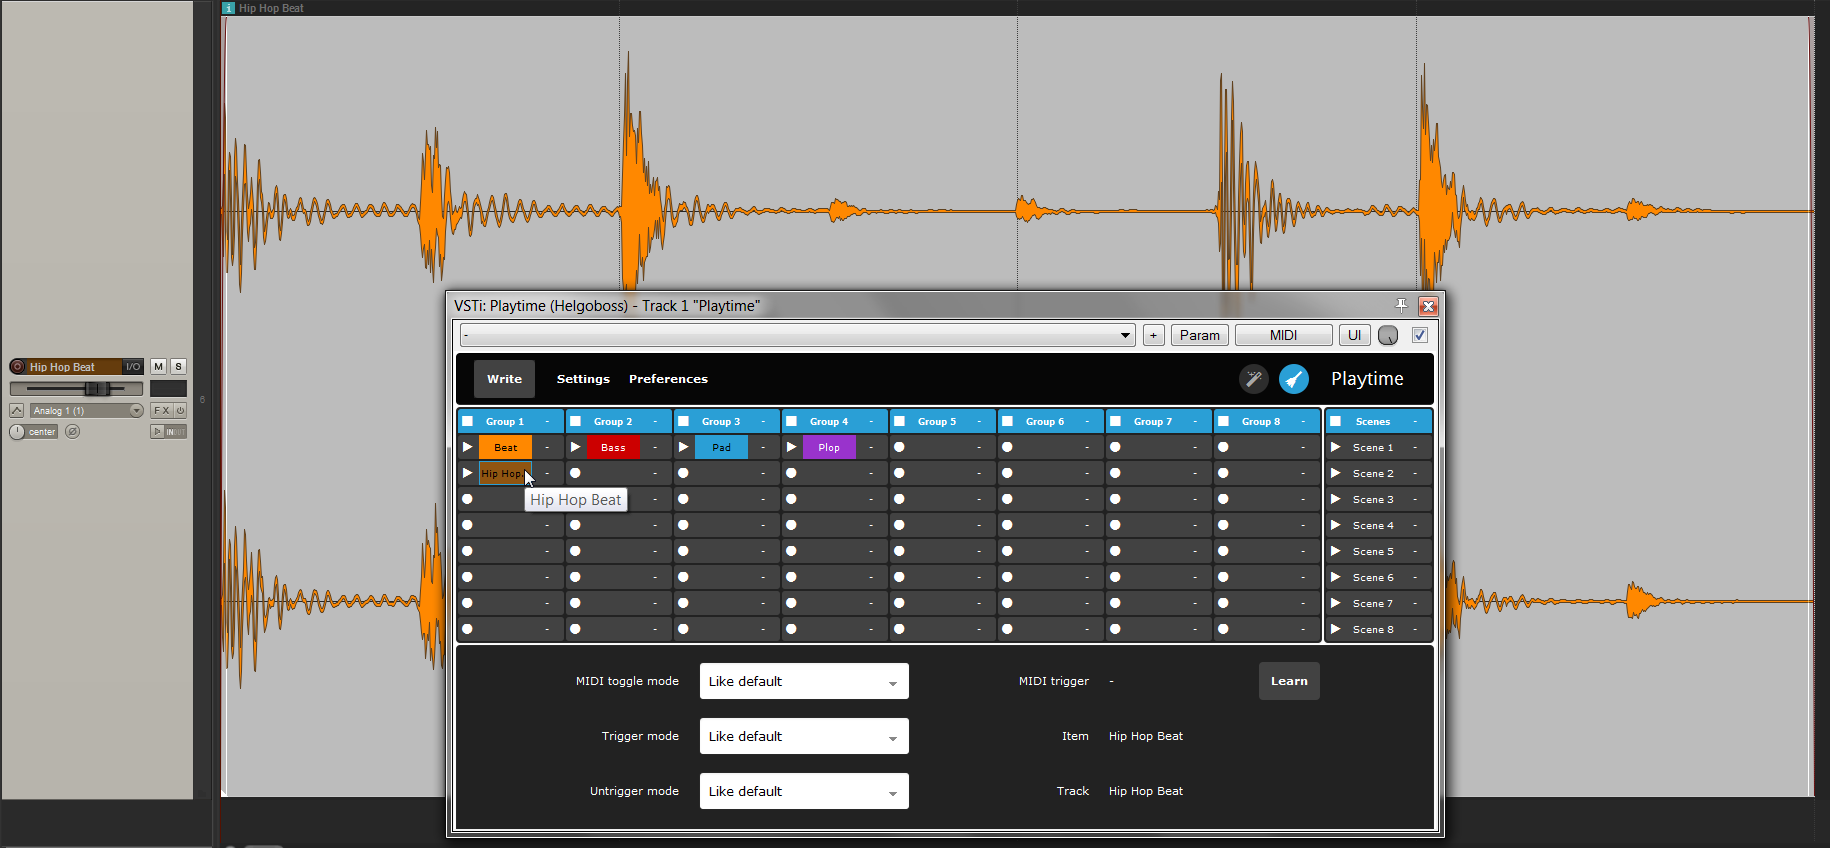
Trigger action
If you trigger an empty slot using your MIDI controller, Playtime by default does nothing or stops the corresponding group (depending on the type of controller). You can tell it to start recording a clip in that slot instead by changing the so called "Trigger action" whose default value is "Play -> Stop/retrigger":
- Click "Settings"
- Navigate to the 2nd page of the detail view by clicking the right arrow
- Select "Record/play -> Stop/retrigger" in the "Trigger action" dropdown
- Set a group track for each group on which you want to record (important!)
- Now, if you trigger an empty slot using your MIDI controller, Playtime will start recording.
There's a third trigger action "Record (!) -> Play -> Stop" to support a "Record -> Play -> Stop -> Record -> Play -> Stop -> ..." workflow for each slot. Attention: If this trigger action is active, a stopped non-empty slot will be overwritten with a new recording as soon as it is triggered! This mode temporarily turns "Auto-play recorded clips" on and "Exclusive mode" off.
Auto-select mode
Playtime provides an auto-select mode which can be very useful for quickly applying REAPER actions to clips and group tracks. If auto-select mode is enabled (which it is by default) and you select a slot, Playtime automatically selects its corresponding REAPER item. If the slot is empty, the selection will be cleared. Analogously, if you select a group, Playtime automatically selects its corresponding track. Here's how you disable auto-select mode:
- Click "Settings"
- Navigate to the 2nd page of the detail view by clicking the right arrow
- Select "Off" in the "Auto-select mode" dropdown
With this mode enabled, you can build pretty powerful live setups if you map Playtime actions for slot navigation and REAPER actions for item manipulation to MIDI controllers!
Pool-MIDI-on-write mode
By default, Playtime creates pooled copies of MIDI items when you use the "Write" button. That means MIDI items written on the timeline are still connected to the original Playtime clips with regard to the MIDI content. If you don't like that:
- Click "Settings"
- Navigate to the 3rd page of the detail view by clicking the right arrow twice
- Select "Off" in the "Pool-MIDI-on-write mode" dropdown
"Move items between tracks" mode
By default, the group track is only relevant for recording clips, not for playing them. For example, a clip can be on track 5 although its group has track 4 assigned. Groups in Playtime are primarily a structuring tool, they don't impose any restriction on where a clip lives. If you prefer a more "Ableton Live"-like behavior, Playtime can move a clip to the according target group track whenever you move/copy a clip to another slot.
- Click "Settings"
- Navigate to the 3rd page of the detail view by clicking the right arrow twice
- Select "On" in the "Move items between tracks" dropdown
Playtime won't automatically move existing clips which don't reside on the group track! So this setting works best if you enable it as soon as you start your project.
Record start time and Record stop time
Analogously to "Play start time" and "Play stop time", you can influence the start and stop time for recording clips. You'll find those options on settings page 3.
Default loop fade time
Whenever Playtime creates sections (e.g. when filling a slot with an item or when cropping a clip), it uses a section fade time of 10ms by default. You can increase this value using the option "Default loop fade time" on settings page 3.
The same setting is also used when recording audio clips. After recording, Playtime automatically draws a take volume envelope fade-in and a fade-out of the length specified in this setting in order to decrease the likelihood of clicks between loops. That works because Playtime automatically loops take envelopes provided they don't exceed the take length.
Use MIDI sections on fill
When filling a slot with an audio item and the audio item is not extended to its full length, Playtime creates a section in order to preserve the item cut. That's better than glueing because the original length can be easily restored (non-destructive) and no rendering has to be done. When filling a slot with a MIDI item, Playtime by default uses glueing instead of sections because REAPER officially doesn't support MIDI items with sections.
You can still turn it on using the option "Use MIDI sections on fill" on settings page 3. It actually works but has some purely visual implications that might be confusing.
Converting loops to one shots and vice versa
Playtime supports both loops and one shots. If you record a clip in Playtime, it will always end up as a loop. If you fill a slot with a file (via drag'n'drop or slot context menu), REAPER preference "Project => Media Item Defaults => Loop source for ..." determines if the resulting clip will be a loop or one shot. If you create the clip via "Fill with (copy of) selected item", it depends on the item property "Loop source". If you want the clip to be treated as a one shot instead, proceed as follows:
- Right click on the slot
- Click "Convert to one shot"
- As a result, Playtime removes any time stretching, marks the item source as not looped and sets its timebase to "Beats (position only)".
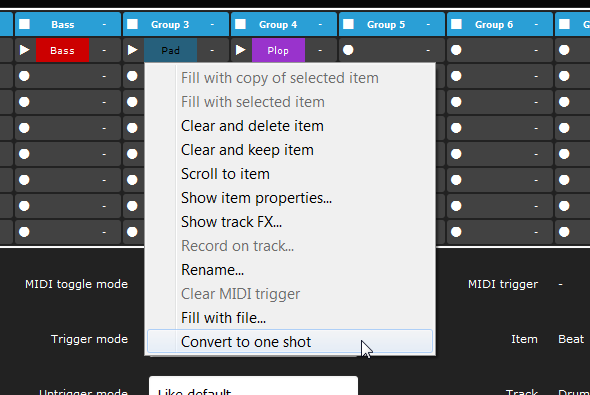
If you want the opposite direction, just choose "Convert to loop".
Settings vs. Preferences
If you have wondered what's the difference between "Settings" and "Preferences", here's the answer.
Settings are saved with this particular Playtime instance in that particular project you are working on. It won't have an effect on your next project. Preferences are saved globally. This is comparable to REAPER's "File => Project settings..." vs. "Options => Preferences...".
Automation
Basics
Almost every function of Playtime can be invoked by automation envelopes or MIDI/OSC controllers and control surfaces. Just use the standard REAPER automation features. Playtime has lots of automatable parameters. Infact, the majority of functions in Playtime uses parameter automation under the hood - even if you invoke them via the user interface or a MIDI controller. It all boils down to automation.
To be clear, we are not only talking about invoking the triggering of slots, scenes and groups here. That alone can also be achieved using Playtime's built-in MIDI learn feature. No, we are also talking about changing settings like for example play start times. The ability to automate all of Playtime's functions leaves much room for experimentation.
For example, if you want to change the default play start time by moving a fader on your control surface, change the default play start time using the Playtime user interface, press "Param => Learn" in the Playtime window, move the fader on your control surface and press OK.
Not all automatable parameters can be learned by using "Param => Learn". You can get an overview over all automatable parameters by opening REAPER's automation window: Click on the small envelope symbol on the left side of the Playtime track header:
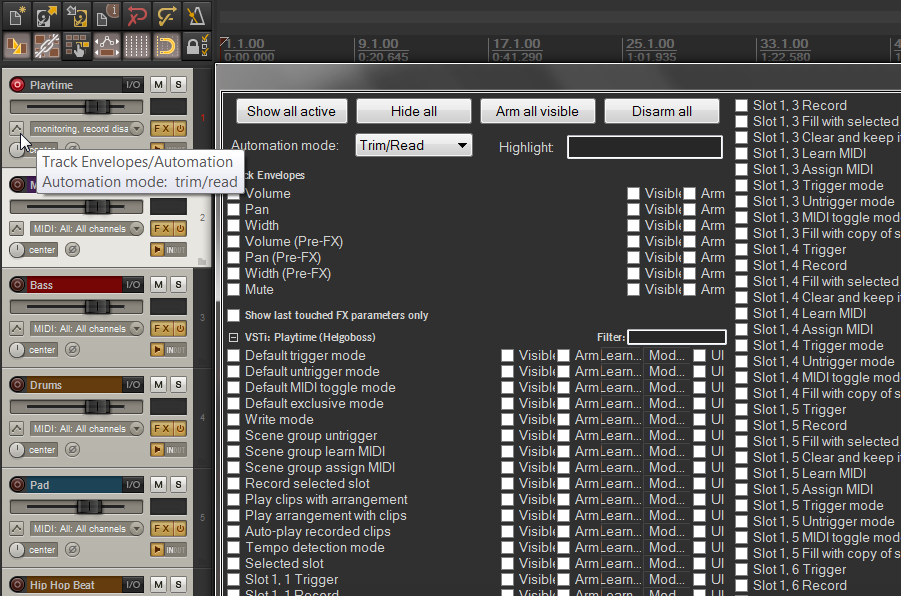
In this window, you can easily MIDI-learn every available function.
Since Playtime 1.7.0, another option for controlling Playtime's automatable parameters via MIDI controller is available: You can create your own controller configuration file. It's more advanced and there's no MIDI-learn feature for that but it might be the better option in some cases because solely using standard REAPER automation features has some drawbacks:
- The controller mapping doesn't follow the "Connected controller" option in Playtime
- REAPER listens for events on the so-called MIDI control path instead of the more flexible current track MIDI path. That also means, you need to have "Control" enabled for the MIDI device in preferences.
Infact, support for dedicated controllers like the Launchpad is done using those controller configuration files.
List of global automation parameters
Here's a list of all available global automation parameters. In this context, global means that the underlying function doesn't relate to a specific slot, scene or group. Have a look in REAPER's automation window for the Playtime track to see all automation parameters, not only the global ones.
Some of the global automation parameters are not accessible via Playtime's user interface because they make most sense to be used with controllers. Those parameters are described in more detail in the description column.
| ID | Name | Recommended mode | Description |
|---|---|---|---|
| defaultTriggerMode | Default play start time |
|
|
| defaultUntriggerMode | Default play stop time |
|
|
| defaultMidiToggleMode | Default MIDI toggle mode |
|
|
| defaultExclusiveMode | Default exclusive mode |
|
|
| writeMode | Write mode |
|
|
| untriggerSceneGroup | Scene group untrigger |
|
|
| sceneGroupLearnMidi | Scene group learn MIDI |
|
|
| sceneGroupAssignMidi | Assign MIDI to scene group |
|
|
| selectedSlotRecord | Record selected slot (advanced) |
|
Starts recording something into the currently selected slot. This is good for using Playtime as a looper in combination with the option "Auto-play recorded clips". Make sure the group which contains the selected slot has a group track set. In most cases it's advisable to select "Toggle (>0=toggle)" as CC Mode in the MIDI/OSC Learn window. |
| selectedSlotRecordSimple | Record selected slot (simple) |
|
|
| playClipsWithArrangement | Play clips with arrangement |
|
|
| playArrangementWithClips | Play arrangement with clips |
|
|
| autoPlayRecordedClips | Auto-play recorded clips |
|
|
| tempoDetectionMode | Tempo detection mode (advanced) |
|
|
| selectedSlot | Selected slot |
|
Selects a slot by navigating row-wise |
| gotoPreviousSlot | Go to previous slot |
|
|
| gotoNextSlot | Go to next slot |
|
|
| defaultOffsetMode | Default offset mode |
|
|
| sluggishnessTolerance | Sluggishness tolerance | ||
| - | Instance ID | - | Used internally for managing multiple Playtime instances |
| leftmostControlledColumn | Leftmost controlled column |
|
Defines the left side of the slot area that is controlled by the connected grid controller. |
| upmostControlledRow | Upmost controlled row |
|
Defines the upper side of the slot area that is controlled by the connected grid controller. |
| selectedSlotFillWithSelectedItem | Fill selected slot with selected item |
|
Fills the currently selected slot with the currently selected item |
| selectedSlotClearAndKeepItem | Clear selected slot and keep item |
|
Clears the currently selected slot but keeps the media item |
| selectedCellLearnMidi | Learn MIDI for selected cell |
|
Activates the MIDI-learn mode for the currently selected cell |
| selectedCellAssignMidi | Assign MIDI to selected cell |
|
Assigns a MIDI trigger to the currently selected cell |
| selectedSlotTriggerMode | Play start time of selected slot |
|
Sets the play start time of the currently selected slot |
| selectedSlotUntriggerMode | Play stop time of selected slot |
|
Sets the play stop time of the currently selected slot |
| selectedCellMidiToggleMode | MIDI toggle mode of selected cell |
|
Sets the MIDI toggle mode of the currently selected cell |
| selectedSlotFillWithCopyOfSelectedItem | Fill selected slot with copy of selected item |
|
Fills the currently selected slot with a copy of the currently selected item |
| selectedSlotOffsetMode | Offset mode of selected slot |
|
Sets the offset mode of the currently selected slot |
| selectedGroupUseSelectedTrack | Use selected track for selected group |
|
Sets the currently selected track as group track for the currently selected group |
| selectedGroupClearTrack | Clear track from selected group |
|
Clears the group track from the currently selected group |
| selectedGroupExclusiveMode | Exclusive mode of selected group |
|
Sets the exclusive mode of the currently selected group |
| selectedSlotClearAndDeleteItem | Clear selected slot and delete item |
|
Clears the currently selected slot and deletes its media item |
| recordIfSlotEmptyMode | Trigger action |
|
|
| selectedSlotTrigger | Trigger selected cell (advanced) |
|
Triggers the currently selected cell |
| selectedSlotTriggerSimple | Trigger selected cell (simple) |
|
|
| selectedSlotRecordAndRight | Record selected slot, go right (advanced) |
|
Works like "Record selected slot" but automatically selects the next slot column-wise after the recording is done. This is pretty cool for using Playtime as looper because it enables you to record a complete piece layer over layer by having just one foot switch. In most cases it's advisable to select "Toggle (>0=toggle)" as CC Mode in the MIDI/OSC Learn window. |
| selectedSlotRecordAndRightSimple | Record selected slot, go right (simple) |
|
|
| selectedSlotRecordAndDown | Record selected slot, go down (advanced) |
|
Works like "Record selected slot" but automatically selects the next slot row-wise after the recording is done. |
| selectedSlotRecordAndDownSimple | Record selected slot, go down (simple) |
|
|
| selectedCellHorizontal | Selected cell horizontal |
|
Selects a cell by navigating in the current row |
| gotoLeftCell | Go to left cell |
|
|
| gotoRightCell | Go to right cell |
|
|
| selectedCellVertical | Selected cell vertical |
|
Selects a cell by navigating in the current column |
| gotoCellAbove | Go to cell above |
|
|
| gotoCellBelow | Go to cell below |
|
|
| autoSelectMode | Auto-select mode |
|
|
| poolMidiOnWriteMode | Pool MIDI on write mode |
|
|
| recordStartTime | Record start time |
|
|
| recordStopTime | Record stop time |
|
|
| selectedSlotOverdub | MIDI overdub selected slot |
|
Overdubs MIDI clip in currently selected slot |
| loopSectionOfMidiItemSourceOnFill | Loop section of MIDI item source on fill |
|
Use MIDI sections on fill |
| defaultLoopSectionFadeTime | Default loop fade time | ||
| selectedSlotSectionStartPosition | Selected slot section start position |
|
|
| selectedSlotDecreaseSectionStartPos | Decrease section start position of selected slot |
|
|
| selectedSlotIncreaseSectionStartPos | Increase section start position of selected slot |
|
|
| selectedSlotSectionLength | Selected slot section length |
|
|
| selectedSlotDecreaseSectionLength | Decrease section length of selected slot |
|
|
| selectedSlotIncreaseSectionLength | Increase section length of selected slot |
|
|
| toggleFullScreenSimple | Toggle full screen mode |
|
|
| moveItemsBetweenTracksMode | Move items between tracks |
|
For further info about automation in REAPER, please consult the REAPER user guide.
Keyboard shortcuts
If "Keyboard control" is switched on in the preferences, Playtime can be controlled via keyboard shortcuts to some degree. Here's the list of shortcuts:
| Key (Windows) | Key (Mac OS X) | Effect |
|---|---|---|
| Up Right Down Left |
Up Right Down Left |
Navigates in the slot, scene and group area |
| Ctrl+Up Ctrl+Right Ctrl+Down Ctrl+Left |
Cmd-Up Cmd-Right Cmd-Down Cmd-Left |
Scrolls the slot area if there are more slots than currently visible |
| Shift+Alt+Up Shift+Alt+Right Shift+Alt+Down Shift+Alt+Left |
Shift-Opt-Up Shift-Opt-Right Shift-Opt-Down Shift-Opt-Left |
Resizes the user interface |
| Shift+Return | Shift+Return |
Triggers/untriggers the selected slot or scene or untriggers the selected group or records the selected slot if it is empty and a group track is set. Shift+Return has been favored over Return because Return alone is already reserved by REAPER ("Transport: Play/pause"). |
| Ctrl+C | Cmd+C | Copies the current cell (slot, group or scene) |
| Ctrl+X | Cmd+X | Cuts the current cell. It won't be actually cut until you paste it. |
| Ctrl+V | Cmd+V | Pastes the copied or cut cell. When pasting a cut cell into another cell, the other cell will swap positions with the cut cell. |
| Delete | Delete | Clears the current slot, group or scene and deletes the corresponding item(s) |
| F | F | Toggles full screen mode |
All other shortcuts are forwarded to REAPER.
REAPER actions
Show/hide Playtime
As soon as Playtime is loaded, it offers the REAPER action "Show/hide Playtime". You can find it via "Actions => Show action list...". The action finds the first Playtime instance in your project and shows it in a floating window. If it is already open, it closes it.
You can assign a keyboard shortcut or a MIDI event to the action or create a toolbar button in order to quickly switch between session view (Playtime) and arrange view (REAPER timeline). I personally like to assign the keyboard shortcut "Shift+Alt+P" because it's not yet reserved by REAPER.
Really advanced stuff
Roll your own controller
Playtime supports controllers (Launchpad, Orbit etc.) via simple configuration files. That means you can add your own controller configurations. In order to be picked up, your controller configuration file must have a different name than the built-in controller configuration files because Playtime prefers the built-in files.
The built-in controller configuration files can be found here:
- Mac OS X:
/Library/Application Support/Playtime/controllers - Windows:
C:\Users\All Users\Playtime\controllers
Your own controller files are picked up from here:
- Mac OS X:
/Users/USER_NAME/Library/Application Support/Playtime/controllers - Windows:
C:\Users\USER_NAME\AppData\Roaming\Playtime\controllers
The configuration file format is JSON. Here's a description of the configuration options:
| Configuration key | Description |
|---|---|
| name | Name of the controller |
triggersAreFixed |
If true, MIDI triggers don't move on drag'n'drop. If false, they do. |
visualFeedbackIsEnabled |
If true, Playtime sends MIDI notes to the controller to enable visual feedback. If false, it doesn't. |
beatIndicationIsEnabled |
If true, Playtime sends very short MIDI notes to the controller on each beat during a countdown so the tempo gets visible. If false, it doesn't. Some devices don't support this. |
emptySlotUntriggersGroup |
If true, Playtime untriggers the corresponding group if the user attempts to trigger an empty slot or scene. If false, it doesn't. This is for devices which don't have dedicated stop buttons. |
lights |
Defines the velocities of the MIDI notes which are sent to the controller. Different velocities usually translate to different light colors. |
midiTriggers → slotsmidiTriggers → scenesmidiTriggers → groups
|
Defines the default MIDI triggers for slots, scenes and groups. This is typically the largest part of the controller configuration. Fortunately, it can be auto-generated by Playtime: Just learn all the MIDI triggers for your particular controller, right click the label "Connected controller" in the settings detail view and choose "Generate controller template". You can copy'n'paste the resulting JSON configuration into your text editor. |
midiTriggers → global |
Defines the MIDI triggers for global Playtime functions. You can map any of Playtime's global automation parameters here. Unlike the simple MIDI triggers for slots, scenes and groups, the global MIDI triggers can't be conveniently MIDI-learned in Playtime. That also means, the auto-generated controller configuration won't include the global MIDI triggers. You have to write that manually. So here's some explanation.
You don't have to calculate the MIDI key numbers yourself. Playtime's auto-generate feature for slot, scene and group MIDI triggers can help you with that: Just activate Playtime's MIDI learn for one slot, move/press the fader/button of your controller, right click the label "Connected controller" in the settings detail view and choose "Generate controller template". Then you can find the MIDI key number in the |
Contributions are welcome. Please send them to info@helgoboss.org. Thanks!
Side effects
Playtime makes heavy use of existing REAPER features to do its job. It interacts with REAPER in some ways you might not expect:
- On startup, Playtime disables "Stop/repeat playback at end of project" (for example to enable you to trigger clips spontaneously without interfering with the existing items on the timeline)
- It doesn't disable this option permanently. Just for the current REAPER session.
- On startup, Playtime disables "Prompt to save/delete/rename new files on stop" (to enable comfortable recording within Playtime)
- It doesn't disable this option permanently. Just for the current REAPER session.
- On startup, Playtime disables "Set media items offline when application is not active" (to enable triggering clips even if the REAPER window is not focused)
- It doesn't disable this option permanently. Just for the current REAPER session.
- Whenever you trigger a clip using Playtime, it makes sure that the track is set up appropriately:
- It enables free item positioning (to support multiple simultaneously playing clips on one track)
- It disables media buffering (to enable realtime triggering of audio clips without any audible latency)
- You can switch off that behavior in "Preferences" but it's not recommended.
- It disables anticipative FX (to enable realtime triggering of MIDI clips without any audible latency)
- You can switch off that behavior in "Preferences" but it's not recommended.
- Whenever you record a clip, Playtime switches off "Repeat" (because "Repeat" would interfere with Playtime's loop recording logic)